
We have tried to make our normal outreach workshop accessible to all ages online. We welcome all feedback to help improve this page. If anyone gets totally stuck or does not know why their program doesn't work just send the file to nar25@aber.ac.uk and we will get back to you.
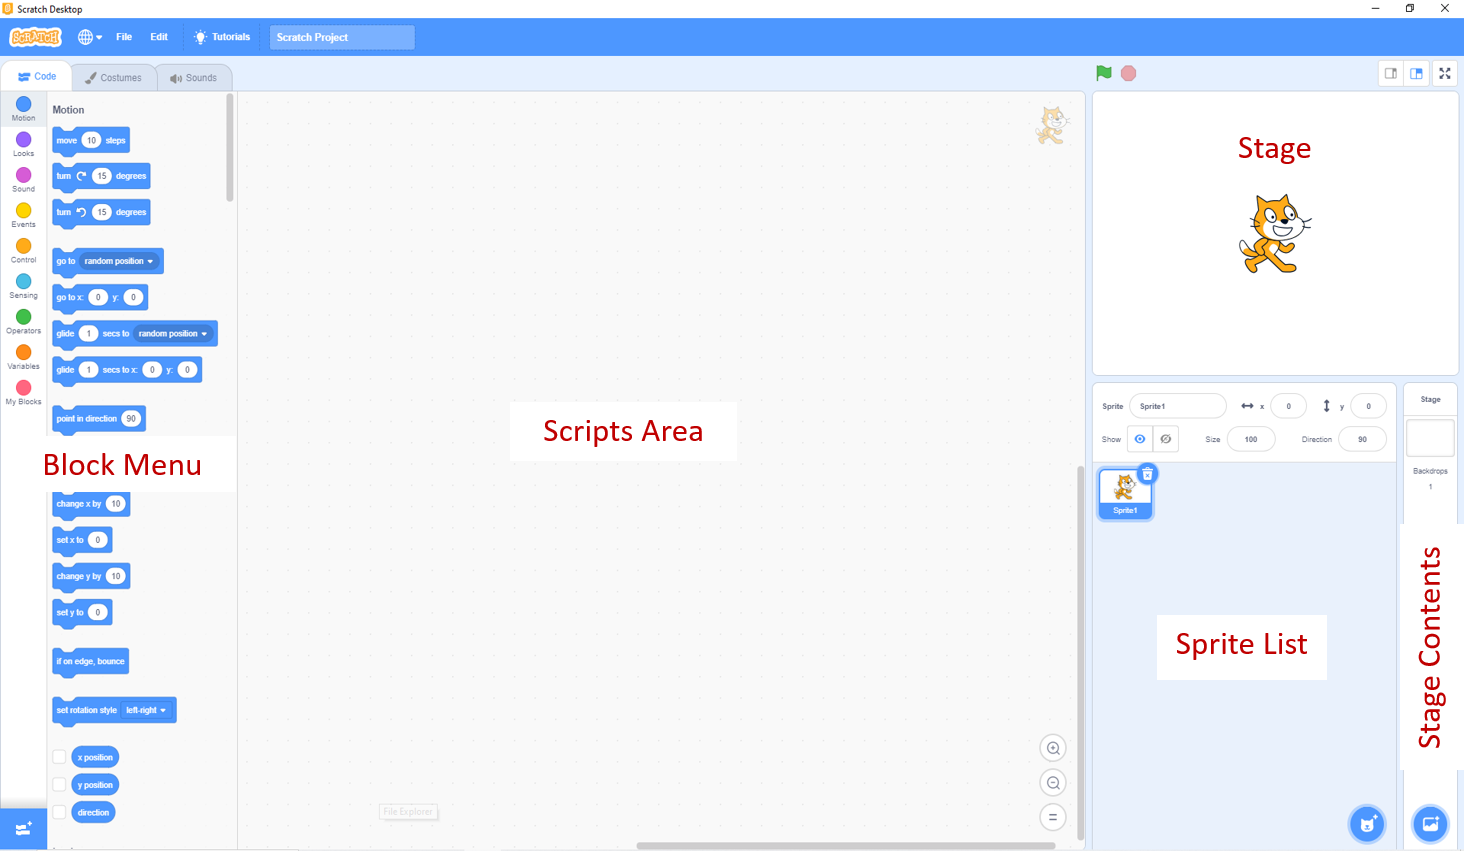
You can use browser-based Scratch or downlaod the desktop version. See the below image for the general layout of Scratch. I have added labels for the key areas of the screen to help you find your way around - look out for the highlighted text to show when these label names are used
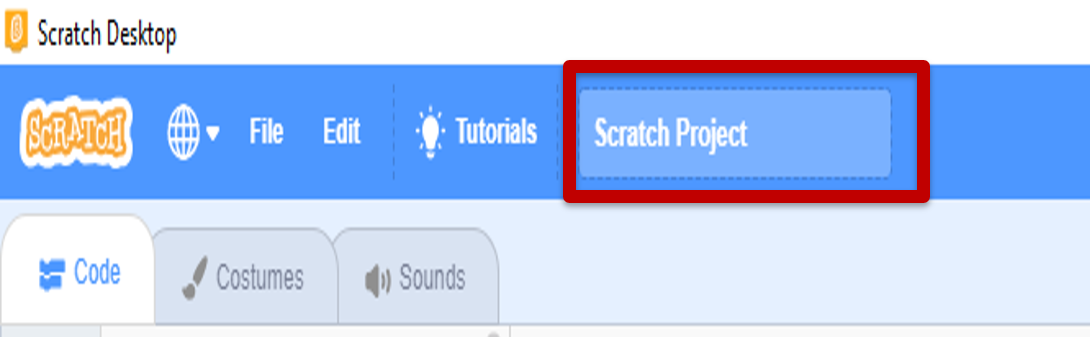
First thing is to create a file name for your game. You can do this by entering your chosen game name in the box highlighted below
Now take a little while to look at the 'blocks' in the Block Menu
If you look at your Stage you will see a cat image. This image is called a sprite. You can also see it in the Sprite List.
I think we should choose a more Space-Age character for this game. This means we need to delete the cat from our Sprite List using the bin image shown below
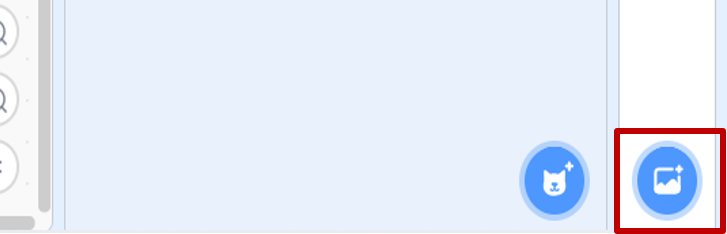
Now our Stage is empty. We can add a new sprite using the icon in the Sprite List as shown below
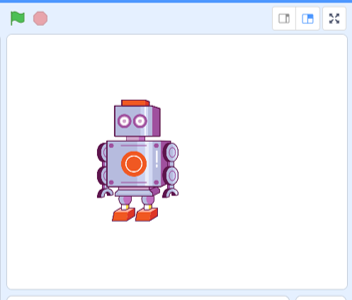
This will load up a selection of different sprites. Look for and select the 'Retro Robot'
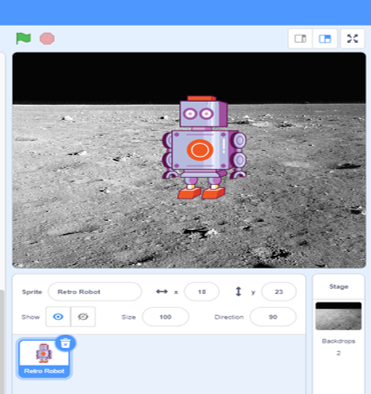
Your Stage should now look like this...
It is now time to make our first script. We want the robot to be our main character and move with our mouse around the screen.
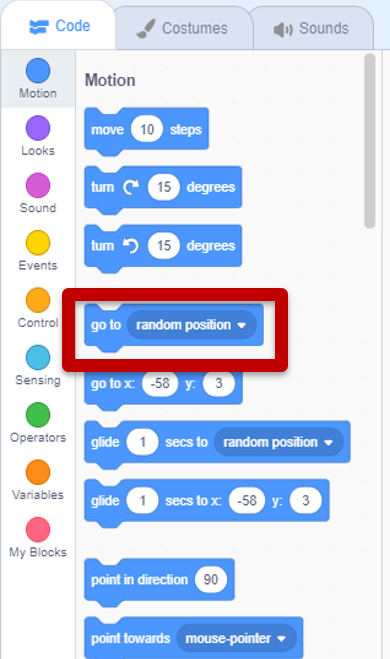
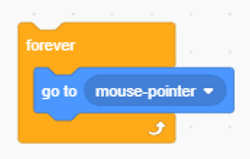
Find the 'Go To' block in the Block List, as highlighted in the image to the left, and change the 'random position' to 'mouse-pointer' on the drop down menu.
Now click and drag the block into the Scripts Area.
Well done, you have just created your first line of programming for this game.
The block we now have in the Scripts Area tells the robot to go to where the mouse is on the screen. The problem is that we haven't told it when or how often. We want it to follow the mouse for the whole game. To do this we need to put this block inside a forever loop This means the command to go to the mouse pointer will repeat 'forever'.
To do this, you will need to find the forever block in the Block List and drag it to the Script Area. We can then move the blocks together like a jigsaw so the 'go to' command is inside the 'forever loop'. See the image to the right.
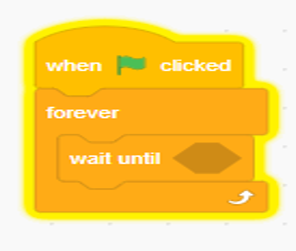
The script is not quite finished. We now need to tell it when to start this part of the program. We want it to start from the very beginning, which is when we click the green flag icon on the Stage. For this we need to find the block that tells it 'when the green flag is clicked' and drag it onto the top of our script.
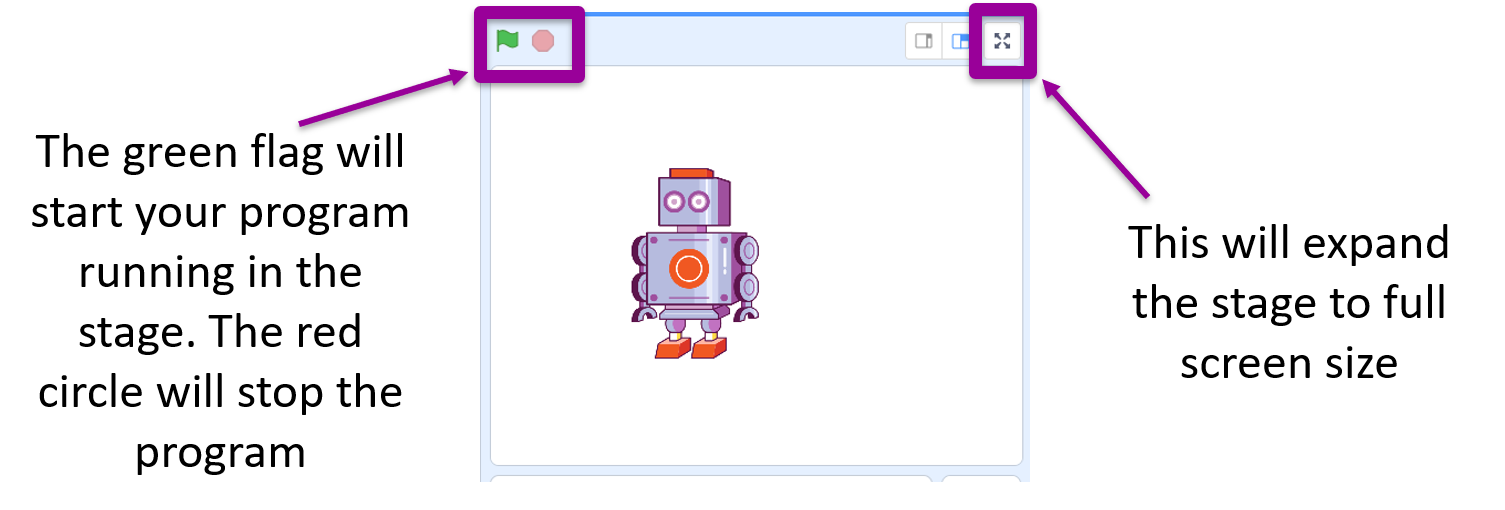
Having completed a script we should now test our program. We can do this in the Stage by clicking on the green flag. To stop the program click on the red icon next to the flag. Remember you can also make the stage fullscreen to really test the movement
Does your robot follow the mouse wherever you move it to? If yes, then the script worked. If not, have another look at the instructions in Step 3.
Hint - You should have three blocks jigsawed together in your script.
If you are really, really, really stuck... Here is the solution for Step 3.
We now need a background for our game. We do this in a very similar way to adding new a new sprite. There is an add background icon at the bottom of the Stage Contents. See image below.
Select the moon surface image from the list that comes up. Now your stage should look something like this;
Remember, if you've run the program, the robot will be in the last position you stopped the program at, meaning it will probably be half off the screen in the top left corner. You can move the robot sprite to a different location on the Stage by clicking and dragging.
In this step we shall be adding another item or sprite to the game.
Being on the moon means there would not be much for the robot to collect, so we shall have it picking up rocks for study by scientists on Earth.
To do this we need to add a new sprite like we did in Step 2 for our robot, this time we will select rocks from the list
You should now be able to see both your robot and the a pile of rocks on your Stage
What do you think will happen if we run the program now?
Let's run the program to see what happens...
Your robot should continue to move around with the mouse pointer.
The rock does nothing.
The robot just moves over the rock as if it wasn't there.
We want the game to do something when the robot touches the rock, in this section we'll look at how to do this.
Have you noticed that when we added the Rocks to our program your script disappeared?
This is because each item or sprite has its own Script Area. If you click on the Robot sprite in the Sprite List the script will reappear. There is also a little image in the top right corner of the Scripts Area showing which item we are looking at.
Now select the Rocks sprite to open its empty Scripts Area. We want to tell the rocks to do something when the robot touches.
To start with you will need to put together the below script
Can you see what is missing? There is a darkened section with no instruction as to what the rocks need to wait for. See is you can find the correct block to go inside that will tell the rocks to 'wait until touching Retro Robot'
We cannot test to see if you got it right yet, as we haven't told the rocks what to do when they are touching the robot. Let's start by telling them to make a popping noise. Find the block that says 'play sound pop until done' and put it inside the forever loop underneath the wait until block
Now we have a complete set of instructions for the rock to follow. Time to test it and see if you got it right.
What happens when you run the program now?
What should happen?
- The robot should move with the mouse
- The rock should stay still
- When the robot is touching the rock it makes a popping sound until you move the robot away
Possible problems:
The robot doesn't move - Check you have one script in the robot sprite and one in the rocks sprite
The rock moves but not the robot - Check each item has the correct script
No sound - Check your volume is on
Only pops once - check your script for the rocks says play sound 'pop' until done
If you are really stuck, you can check here for the solution to Step 6.
Now we need to make it so the robot 'picks up' the rocks. One way we can do this is for them to jump to a new location when the robot touches them. This means the player can chase the rocks around the screen
To do this we need to find a block that we can put into the rock sprite script, inside the forever loop below the play sound command, that tells the rock to 'go to random position'
As we have made a new change to the script for this program we should test it to make sure it works
Now the rock should make a single pop noise when the robot touches it and then jump to a new location. This should repeat whenever the robot touches the rock.
If it doesn't do this then double check the instructions in Step 7.
Still having issues then you can check the solution for Step 7
At the moment it appears that the rocks are being mena to the robot and keep running away.
 Instead we want to make it seem like the robot is collecting them. One way to do this is to add a scoring system to tell the player how many times they have collected the rocks.
The problem is, where can we find a block for scoring?
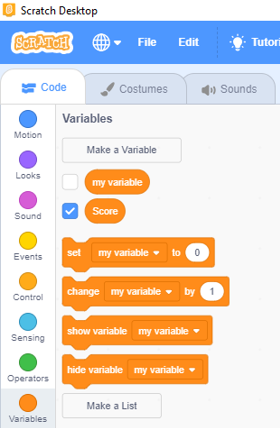
For information in a game that needs to be kept track of, like a score, inventory or number of lives we need to have variables. These are named values that we can change.
To create a variable for scoring we need to find the option 'Make a Variable' on the Block Menu, click on it and name it 'Score'
This new block should now be visible in the Block Menu, as shown in the image. The tick in the box next to it puts the score box on the Stage, untick it and the score is no longer visible to the player. We want the player to know there score so make sure the box is ticked.
We now need to find a way to tell the program how to keep score.
As we gain points by touching the rocks we will add the scoring instructions to the rocks script. To make sure you have the correct Scripts Area open check the image in the top right corner is a faint picture of the rocks sprite.
First we need to tell the program that the score should be zero at the start of the game using a block that reads 'set score to 0'. Then, we need a second block that tells the score to go up by 1 everytime the rock is touched this will read 'change score by 1'.
See if you can find the right blocks and put them in the right places in the script
Let's see if you found the right block and put them in the right places. Run the program in the stage, give it a play and check what happens to the score. Then stop the program and restart oit to make sure that the score starts at 0 again.
The score should go up by one point everytime you touch a rock, and it should reset to zero when you start a new game.
Don't worry if it doesn't work first, second, or even third time as this was a bit of a challenge
The correct script is shown below.
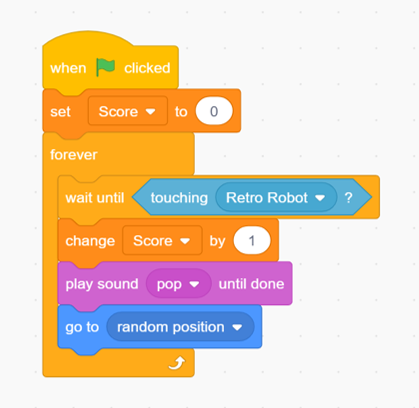
See how the instruction to set the score to zero is not inside the forever loop. If it was the game would forever keep setting the score to zero, we only want it to do it once, at the very start.
The change score command is then inside the loop so it happens every time the robot touches it.
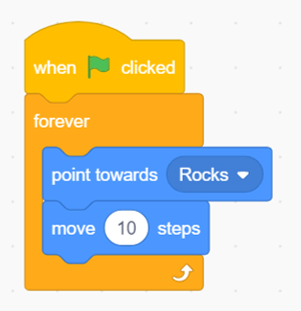
It's time to make the game more challenging, let's bring in an NPC - a Non Player Character - to compete with.
This means adding a new sprite. This time you choose who your enemy should be by picking the sprite. Make sure it is different to the rocks and retro robot or the game could become very confusing. If you need a reminder for how to add a sprite re-visit Step 2.
Once you've chosen your NPC we need to give it a script for what to do. Below is a basic script that can be added to the blank scripts area for your NPC sprite. It instructs our new character to move towards the rocks 10 steps at a time.
Let's test our new script by running the program.
OH NO! What's happening?
The program should still allow the player's robot to pick up the rocks and get a score with no problem as the enemy is chasing and glitching over the rocks whilst not staying the right way up.
When a program starts to do something that you didn't expect it is called a bug. Debugging is the name given to the corrections we have to make to fix the problems.
The first 'bug' we will fix is the NPC not staying the right way round as it moves around.
This is quite easy to correct, all we need to do is add a block that reads 'set rotation style...' Then select 'don't rotate' in the drop down list. Add this block to the NPC's script - inside the forever loop so it doesn't ever spin
To solve the second problem that the NPC just hovers over the rocks doing nothing to stop the player, we need to make the NPC steal the rocks
This is probably a good time to tell you that a sprite can have more than one script of instructions. As we need the rock to now react when the enemy touches it we need to build a second script in the Rocks Sprite.
The new script should start with the 'When (green flag) Clicked' block, then a forever loop with 'wait until touching (NPC sprite)' and 'go to random position' blocks inside it.
Having introduced a new script to our program we need to test it again, so run the program and see what happens.
The NPC should now be stealing the rocks whenever it gets there first, it is now a race to collect each rock
If there are still issues with your program that you cannot fix or you are just stuck here are the solutions for the both the rock script and NPC script
Now we need to tell the program when to stop instead of going on with no real challenge forever. To do this we need to stop the game when the NPC touches the player. Then the game will be to collect the rocks whilst avoiding the NPC.
To do this we shall add a new script to the Player (retro robot) sprite. You will need to start with the same block of when (green flag) clicked attached to a forever loop. Inside that forever loop we need to add an instruction to wait until touching (NPC) and a block to tell the program to 'stop all' when this happens.
Can you find and put together all these blocks correctly? If you are struggling to get this to work, then check out the solution for Step 11.
As a final activity, we should look to shrink down the sprites in our game to give us more space for the players to move around. I have done this for the Retro Robot script shown in the solution for Step 11. You need to copy and then repeat in just one of the scripts for each of the sprites. It doesn't matter which of the scripts as the instruction goes between the start point and forever loop.
Your game is now ready to play. See who can get the highest score. Perhaps check out the next section of ideas for how to improve and/or personalise your game. Make it your own. Enjoy!
Below I have added a list of ideas for how you could personalise your game and continue to develop it
More sound effects...
Background music...
Different sprites...
More Sprites...
Different Background...
A start screen...
A Game Over message...
Change NPC movement speed...
Add a Computer score...