Pictured here is the UWA login screen which you will need to use to login to public workstations.
|
Pictured here is the UWA login screen which you will need to use to login to public workstations.
|
|
To use a workstation, you must have a valid login and password to enter into the Login Screen.
For these to be valid, you must already have registered to use the computing services [1].
| NEXT | QUIT |
Logging In
To login to the workstation, first type in your login (an unique user identification[2] ) and either press the Tab[3] key or single click the left mouse button in the Password box.
Then type in your password and press Enter again. If a message appears telling you your login is incorrect, check to be sure the Caps Lock is off; passwords are case sensitive. If you still have difficulty, please go to a Help Desk or ask an advisor.
| NEXT | QUIT |
|
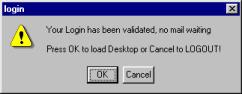
After a successful login, the first message you will see on screen tells you your login has been validated and tells you whether you have mail waiting. If you only wanted to check your mail and find you have none waiting, you can choose Cancel to logout quickly at this point. |
|
Single-click the left mouse button on OK or press Enter to continue.
| NEXT | QUIT |
Next, the Message of the Day screen will appear.
| Remember: Please do read the Message of the Day. It contains important and up-to-date information about the system and workstation rooms. Use the scroll bar on the right-hand side if necessary; the message can be quite long. |
|
Click on OK or press Enter again.
| NEXT | QUIT |
Connecting your Central Filestore
| Now
you will be asked if you want to connect your Central Filestore. The default is No
[4], which you
accept by clicking on No or pressing
Enter.
If you are going to use Email, Favourites, Bookmarks or want to save or restore work from your Central Filestore you will need to say yes. |
|
In order to connect your filestore, click on Yes.
| NEXT | QUIT |
Connecting printers
The next option you are offered is to connect to central printers. If you want to print soon after you login, click on Yes. However, the connection you make to the printer will drop after one hour if you do not use it. So if you don’t think you will want to print anything within your first hour at the PC, choose the default option, No (see previous footnote).
|
Click on Yes. |
|
| NEXT | QUIT |
|
Now you will see a list of all the printers available. You can select up to 4 in any combination, and you can change the combination. Normally however, you would choose just one – probably the one nearest to where you are working. Click the box to the left of the top printer option, Computer Room – HP 4Si and then press Enter. The printer you have just selected is known as the Central Printer and is in the computer room on the top floor of Llandinam building on Penglais campus. The operators distribute output (in returnable polythene bags) every hour, on the half-hour. Output for undergraduates is placed on shelves outside Data Preparation. Postgraduate and staff output is placed on shelves just outside the computer room. |
|
| NEXT | QUIT |
|
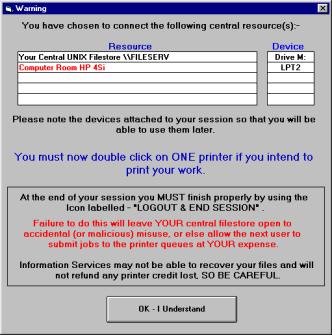
The next screen you see confirms the connections you have chosen, and contains some important warnings. Please read it carefully. Double click with the left mouse button on the name of the printer you have selected, it will then turn red and you will have set this printer as the default printer[5]. Finally click on the OK, I understand button. There will be a short delay and then the Windows NT Desktop will appear. |
|
| NEXT | QUIT |
Printing
Note: Printer connections will drop after one hour if you have not used them
|
Once you have connected to a printer and set it as the default, you can print within most applications by selecting File then Print. This will bring up a standard print dialogue box, such as this one; You must make sure that the printer you wish to print to is showing in the Name: box and that the Print to file: box is not checked. If the Name: box shows the Apple Laser Writer Plus, the application will attempt to print your document to a file on the D: drive of your machine. This file can then be copied to your M: drive and printed out at a later date from a UNIX session[6] Click on OK with the left mouse button, the document will now be sent to the printer. |
|
| NEXT | QUIT |
Checking Print Quota and Queues
Print quota
You will need to check your print quota regularly, to ensure you have enough credit before you send a job to the printer. If you send a job to the printer, but your credit runs out half way through printing your job, your job will finish printing. You will then be in debt to however many pages over your limit you went. You will not then be able to print until you have cleared your debt. Quota can be purchased from any of the library issue desks or from Data Prep, at Ł5 for 125pages.
| NEXT | QUIT |
To check your quota you need to do the following;
Start a KeaTerm session by clicking on the Start button with the left mouse button, move the mouse up to Network Access and select KeaTerm from the list that appears by clicking on it once with the left mouse button.
Once the KeaTerm application has started click on the Connect button in the bottom of the KeaTerm window to start a session. You will be prompted to select a host to connect to, this will be either osfa or osfb depending upon your login [7]. Type in the name of your host and click on the OK button with the left mouse button.
When prompted for your login and password enter them.
You will then be prompted for your Terminal Type, at this point just press the Return button.
| NEXT | QUIT |
You should now be at either an osfa$ or osfb$ prompt.
To check your print quota you need to type psquota.
Type this command (psquota) and note how many pages of print quota you have.
| NEXT | QUIT |
Printer Queues
You can use a KeaTerm session to check that your document has appeared in a print queue and is waiting to be printed.
To check a print queue you first need to know the name of the printer.
All of our printers are called –P<printer name>, for example the Central printer (the one you connected to earlier) is called –Pcentral. A list of all the printers and their names can be found at the back of most workstation rooms or next to the printer itself.
Type the command
lpq –Pcentral
(that is the letter l for lemon, p for peter, q for queen, a space, the minus
symbol, a capital P and then the name of the printer).
This will show any jobs waiting to be printed to the central printer.
Have a go at looking at some of the other printer queues such as a8ps, userarea, holib or coltrans.
| NEXT | QUIT |
[1] You can self-register as long as you know your student number (e.g. your UCAS number). To do this, single-click the left-hand mouse button on Registration and follow the instructions. Help Sheet 1 explains this procedure. If you have any trouble, go to the Help Desk or ask an advisor. [Return]
[2] This takes different forms, depending on your course. It will consist of three or four lower case letters followed by one, two or three digits. [Return]
[3] The Tab key is the fourth key up on the left-hand side of your keyboard. It may be marked ‘Tab’ or may have two arrows pointing in opposite directions. [Return]
[4] You can always connect these resources after you have logged in by selecting then from the menu. [Return]
[5] The printer, that your applications will assume you wish to print to. You can change to a different printer (if you chose more than one when you connected) from within your application. [Return]
[6] Please see Help Sheet 63 – Printing from a Telnet session for more details about this. [Return]
[7] If your login starts with the letters A to L then you need to connect to osfa, if your login starts with M to Z then you need to connect to osfb. [Return]